Kills: 36 Items: 21 (29)** plus the Dragon Seal, 3 keys and 3 secrets
(*Under found items, the number in parentheses shows total including extra items granted for finding all three secrets.)
Go through the antechamber toward the pedestal at the center of the large room. There it is: the Dagger! But of course it's not that easy. As you approach, the floor gives way and you slide down a series of chutes until you're spit out into a pool at the end. Here's the sequence: When the floor drops away, land below, slide and grab the edge. Drop and slide, jump over the blade and continue sliding. The boulder will pass overhead. When you get to the wet, gray slide, jump and twist (ALT + END; that's Jump + Roll for those on other platforms than PC) so you're able to grab the edge of the slide at the end. Shimmy left and pull up into an alcove where you'll find SECRET #1, the Gold Dragon.
Jump in the water, go over the falls and climb out on the platform. Shoot the two fish. Note the nearby keyhole and the ladder leading up to a closed trapdoor. There are two underwater openings across the pool. Find the one on the right. Off to the right is a narrow, underwater tunnel, down which you'll find a small med pack (and a glimpse of a key you can't reach yet). Return to the tunnel opening then swim up into the temple area.
Exit the water on the rocks at the right side and pick up some shotgun shells. Ready that gun, since 2 tigers emerge as you approach the temple doors. After killing them, go around the left side of the building. Use the springboard to jump to the roof. Cross the roof and throw the switch, which opens the trapdoor you saw earlier. Kill the eagle and return to the ladder that leads up to the trapdoor.
Climb up, kill a spider, and continue to a ledge above a room with a large wooden pillar in the center and lava below. Climb down the ladder, then drop and grab the ledge below. Traverse to the left until you can pull up. Descend the next ladder and again drop and grab the ledge below. Then walk to the right, drop and hang, traverse to the right and pull up into an opening where you'll find SECRET #2, the Stone Dragon. Return to the previous landing (just above the lava) the way you came and kill a spider there. Jump and grab the ladder on the pillar. Climb up and follow the passage to a room with ladders and spikes below.
Climb the ladder to the crevice, traverse to the right (to avoid the spikes above), back flip to the ledge behind, then jump forward to the flat spot above where you just were. In the next area, run across the broken tiles and stop on the last one. You'll fall to the pedestal below, where you can pick up some shotgun shells.
Do a running jump over the lava to the opening, slide down and jump over the spikes to land on the angled block ahead. Immediately jump again over a second set of spikes to grab a ledge. Pull up, then slide down the angled block to safely pick up the grenades on the ground. Climb up until you reach a switch, which opens the main doors to the temple.
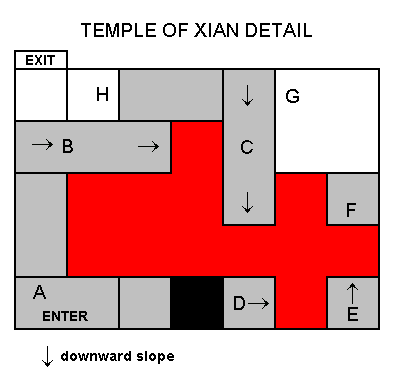
Head back to the temple, enter and go to the rear, avoiding the robot guards. You'll see some M-16 clips lying on the floor. Approach them from the back to avoid being sliced by the robot guard's sword. Go through the right opening on the rear wall and climb up until you reach a room with many angled rocks and lava below. You'll need to make a series of complicated jump and grab maneuvers to get through here. To make it easier, I've included a diagram (below). I refer to areas marked with letters the descriptions that follow. You may be able to manage without the map, but it's kind of hard to describe, so a visual aid may help.
Landing on each angled surface should cause Lara to turn and face downhill. When she does, jumping will propel her forward to the next slope. If she lands facing up a slope, try again. Here's the sequence: From the doorway (A), take a running jump straight across to the long block that slopes down to the right (B). As you start to slide, jump forward to the next angled block ahead (C). (C slopes down and toward the entrance.) Slide and jump forward to land on a small angled block (D), and immediately jump again to land on a fourth sloped block (E). Again, immediately jump to the final block (F). Now climb up to the top of the rocks (G) and take a running jump to grab the ledge above and opposite the entrance (H). From here, you can climb to the next area.
The switch opposite is a decoy. No matter how you approach it, the floor collapses and you slide into the room below. Upon landing, run/jump to the far side of the room, flip the switch to open the exit just below where you slid in, and rush through it to avoid the encroaching spiked walls. (If you want the small med-pack on the ground, you're welcome to try. I couldn't do it.)
Continue to the next room. Head up the ramp, then quickly back and side flip to get out of the way of the rolling metal ball. At the top another ramp slopes down to the right. A second ball comes from the top left. You can trip it by running up the ramp, then jumping down into the depression at the left side. Climb up the step and run over the ramp to trigger yet another metal boulder. If you just keep running, you'll land safely below on the first ramp. Climb back to the top and follow the ladders up.
Drop into the dark room. Cross to the far right and trip the switch, which opens a gate above and to the left, and also frees a tiger which charges from behind you. Once you've killed it, go through the opening to a ladder rigged with slicing blades.
Light a flare before jumping and grabbing the ladder. Drop to pass the first blade and grab the ladder below. Repeat the process with the second blade, then drop/slide into the room below. Here you'll find two perpendicular rolling blades. It's probably easiest to take them one at a time. Once you've passed both, you'll emerge in the anteroom above the robot guards. Kill the 2 eagles before proceeding.
On the wall at the right side is a button that opens the door on the far wall. It's timed but not horribly difficult. Press the button, look to get Lara's perspective back, roll, then do a series of running jumps across the beams: the first two can be taken at a smooth run, the third needs an extra step.
Beyond this doorway is a room with a narrow walkway over lava. Four spiked balls swing from the ceiling. This can probably be done in a number of ways. The easiest for me was to stand to one side of the walkway and run past each ball in turn. The shadows on the floor can help to gauge each ball's position. Also, each ball only has spikes on one side, so you can stand a little closer to the non-spiked side.
Next comes a doorway with a button on each side, a lava-filled hallway with break-away floor tiles beyond. The button on the right raises a floor grate so you can get across to the tiles; the one on the left opens the gate beyond. Press the right button, side flip, press the left button, and run through the doorway. When you manage to get to the end of the tiles, a boulder rolls down from above and behind. You can try and outrun it, jumping at the end of the bridge to grabbing the ledge opposite. It's doable, but I found it easier to cross the broken tiles, stop immediately on the first solid block and safety drop backwards, grabbing the edge of the floor. This way the boulder sails past and you can pull up and continue at your own pace.
Once you get across the lava at the end of the bridge, take the DRAGON SEAL. Then take a running jump to the flat ledge on the right of the dragon. Climb up to the room at the rear. Kill 2 spiders and get 2 sets of auto pistol clips. Pull the switch to raise blocks in the lava out in the main room. Go down toward the lava on the right side (the opposite from where you came up). Run and jump to the low, brown block near the wall, and again to the next block. Run and jump to the short angled block near the stone pillar holding up the bridge, jump to grab the edge of the taller angled block. Pull up, then slide down the front, jumping to land on the flat, high block. Take a running jump and grab the higher block on the right, then another running jump to the lower block below.
You should now be facing the sloped wall where you first entered this area. The ornate block in the lava below, which was a burner, is actually a springboard. Stand at the edge of the block facing the springboard. Hop back, then do a standing jump to the board. Hold down ACTION + FORWARD (CTRL + UP ARROW) to jump from the springboard onto the ledge above. Immediately safety drop backwards, grabbing the ledge to avoid a rolling boulder from above. Run and jump to the flat area ahead and to the right. Jump to the bricks on the right to avoid another boulder. Now hopscotch across the brick areas to the top right. You'll need to kill an eagle on the way. When you've made it to the highest brick block on the right side, slide down the ramp to the springboard at the bottom. As you slide, press FORWARD (UP ARROW) to land on your feet on the platform high above.
Take a running jump to grab the edge of the platform on the opposite side of the room. Pull up and take possession of SECRET #3, the Jade Dragon (with a bonus of 8 sets of Uzi clips for finding all secrets). Run and jump down to the first brick platform on the left side of sloped wall below. Climb to the room at the top left, taking care to avoid the spikes hidden in the sloped floor.
Pull out the block to enter a small room. The switch there opens a trapdoor. There's a ramp below with a boulder set to roll. Run down ahead of the boulder and head to the left. Slide down the next ramp to emerge again in the rafters above the robot guards. Now there are 2 tigers lurking below. Kill them before climbing down.
Use the Dragon Seal to open the gate at the back of the room. Enter and follow the passage to a rolling blade. Run down the hallway, ducking into the alcoves to avoid the blade. The last alcove is actually a doorway with a slide leading down to a room knee-deep in water. The spiked ceiling descends and you need to flip all three switches to open the exit door. (There are also a number of decoy switches but these aren't realistic enough to really trip you up.)
Exit to a room with a waterfall. Jump from the lower block to grab the higher one. Climb up and take a dip in the pool to draw out the 2 biting fish. Kill them before proceeding. This next section has a complex series of underwater levers and gates. Here's the drill: On one side of the pool is an underwater opening with a strong current that prevents you from swimming through. Opposite is a lever which raises the water level and turns off the current. After pulling this lever, head to the right and surface to get air and pick up a large med-pack and some grenades.
Take a deep breath and swim through the tunnel, passing by the lever on the right. Turn left and continue to another lever. Pull this to open the door opposite. Swim through and pull another lever at the end of this short passage. This opens a grate near the first lever (out in the big pool). Swim back out to where you jumped in and surface to get air. Go back under through the door you just opened (next to the first lever you pulled). Pull the lever here to open a gate above the center of the big pool. Swim up to it and climb out.
You're now in the room below the one with the encroaching spiked walls where you were earlier. Kill a fish in the water before retrieving 2 boxes of shotgun shells under the water and some M-16 clips on the pedestal. In the next room, a spiked wall comes from the right, and the switch on the far wall to the left opens a trapdoor nearby. Get down through it as quickly as possible. You'll slide into the water and the current will carry you to the GOLD KEY, which you saw at the beginning of the level behind a gate. This gate opens, and you can swim through to end up are back near the temple entrance.
Return to the platform below the falls and use the gold key in that keyhole. This opens the gate to the left. Go through, then swim underwater to the right, right again and into an underwater room with closely spaced pillars. There's a small med-pack on the floor and a lever on the back of the first pillar. Pull the lever to open the exit, along with a trapdoor farther down the underwater passage. If you need to, get some air and swim back to the platform to climb out and kill that pesky fish. When you're ready, follow the underwater passage in the direction opposite the room where you just pulled the lever. Swim up through the trapdoor you just opened and climb out of the water to kill a couple more fish.
Enter the room with all the spider webs with guns drawn. (Lara can probably spot those spiders better than you can.) There'll be 2 small spiders to start. Turn left and approach the flares on the ground. 2 more spiders drop from the ceiling. Kill them and take the flares. You can go through the webs on the left to get some Uzi clips. A giant spider and a small spider attack, so take care of those, then continue on to the doorway of a large room with a glowing egg sac suspended in the middle. Near the doorway another giant spider attacks, and as you enter 2 more giant spiders drop from the web.
Once the coast is clear, cross to the far side of the room (opposite the entrance) and climb on the one stone block you can reach. Run, jump and grab the higher block to the left. Turn around and jump to grab the ledge above. Proceed from ledge to ledge clockwise around the perimeter of the chamber. Kill the giant spider that drops to the L-shaped ledge when you reach it. From there, take a running jump to the pillar at the center, then another running jump to grab the pillar below the high doorway with faces decorating each side. From here you can do a standing jump to grab the door sill.
Go through this room to the opening over the water. Run, jump over the water and grab the rocks. Climb up and take the SILVER KEY. Return via the water to the cave with the temple. Use the silver key to open the door on the right.
Enter and climb on the lowest block. Jump and grab the next higher block, pull up, jumping to the side to avoid a rolling boulder, and back again to avoid another. Continue to the top and pick up some auto pistol clips on the floor where the boulders originated. Cross the bridge, killing a tiger and an eagle, then a second tiger in the room beyond. Continue to a room with a blade rolling back and forth and an open doorway to the left just before it. (If you're not in great need of Uzi clips, you can skip this next bit.) Jump through this doorway diagonally, so as to land on the slope. Slide back and grab the edge. Climb down, let go and catch the ledge below. Pick up the Uzi clips then continue down the hallway. Drop down into the water outside the temple.
Retrace your steps to the rolling blade. Stand on the slightly sloped floor facing the blade but angled slightly to the right. Take two standing jumps, timing them to avoid the blade, and landing on the top tier. Enter the room with the motionless blade and pick up 2 sets of Uzi clips and a large med-pack. Cross the bridge. The blade doesn't start rolling until you do. Push the button to open doors back in the temple. Kill another eagle, then time a run back across the bridge. If you run after the blade as it rolls away, you'll have just enough time. (Or, if you're not feeling brave, you can dive into the water and go back the long way.)
From the room where you killed the tigers, climb to the gray stones. Here you'll find a series of tiered springboards. Stand with Lara's back to the lowest springboard. Take three steps forward, then back flip onto the springboard behind. This should cause Lara to bounce up the slope using all four springboards. (You can use the arrow keys to adjust her trajectory, but you don't need to jump.) Press ACTION before landing on the last springboard to make Lara grab the ledge above it after takeoff.
Kill the eagle that flies at you at the top. Then jump and grab the door sill of the room above. (These are the doors you opened by pressing the button on the far side of the rolling blade bridge.) Enter this large, lava-filled room and jump to the small platform near a keyhole, then to a larger area to the right. Run to the ladder on the far side and jump/climb up before the spiked wall gets to you.
Dismount on the ledge above. Climb up to the next room and run to the right, jumping the gap over the spikes and grabbing the ladder opposite. More spikes are closing in, so you'll need to be quick about it. Climb up and follow the passageway past two gates looking out over two huge dragon statues, one on each side. Continue to the switch. Pull this to open the gate to get to one of the dragons. From this gate, take a running jump and grab the platform to the left, jump to the next platform, then jump and grab the next platform and pick up the MAIN CHAMBER KEY. Drop down to the dragon's neck. Slide down its back to land on a flat block below. From the lowest step, take a running jump to the flat area where you came in.
Again, jump across to the keyhole and use your newly acquired key in it. This lowers a grate on the stone pillar behind you. Jump back to the large platform by the door, then run, jump and grab the grate. From there, jump to the ladder and climb up to the platform on the right. Turn around and jump over the spikes to grab another ladder. Climb again until you reach the small hallway with the gates where you were earlier. Now the second gate is open. (In case you're disoriented, the dragon you're going for this time is the one that has the central pillar extending all the way to the ceiling.)
Jump from platform to platform until you're facing a block that slopes down toward the dragon. Jump to it and immediately jump again to land on the flat area on the dragon's neck. Climb the ladder until you reach a blade. Position Lara's hands two rungs below the blade, then back flip onto the angled block behind. Jump and grab as you slide to catch hold of the next ladder. Climb to the next blade, position Lara's hands two rungs below it and jump and roll (ALT + END) to twist in the air, then Action (CTRL) to grab the ladder behind. Continue up until you can get off the ladder on the right. Enter this corridor to finish the level.
Here you get another cut scene: Lara emerges above the chamber where the Dagger of Xian rests, only to find that Marco Bartoli has beaten her to it. She watches from the shadows as Bartoli plunges the dagger into his heart. He collapses and his henchmen carry him out on their shoulders.
Copyright © 1998 Stellalune. Special
thanks are given to the participants in the alt.games.tombraider newsgroup,
without whom some parts of this walk-through couldn't have been written.
Feel free to copy, distribute and quote this walk-through, but please include
this credit line so people can send me their corrections, comments and
suggestions. Also, if you'd like to offer this on your own web site, kindly
ask permission first.