LEVEL 2: VENICE
Kills: 24 Items: 19 (23)* plus automatic pistols, 3 keys and 3 secrets
(*Under found items, the number in parentheses shows total including extra items granted for finding all three secrets.)
This level begins in an alley. Advance forward, taking care of a doberman that charges from the courtyard ahead. A sniper will fire at you from a balcony on the right, so take care of him too. He's carrying a key, but you'll have to come back for it later, since the balcony is too high to reach from here. Proceed down the alley on the left of where you came in. Another dog and a bat-wielding thug will try and stop you, so kill them too, then take the thug's small med-pack.
Across the dock is the large wooden door of the boathouse. Swim underneath the door and push a button on the far wall, which opens a door in one of the buildings you passed earlier. Swim back out and climb onto the dock next to the small wooden building. Enter this building and take the flares off the table. Push the button to open the trap door and either climb the ladder or pull up to the second floor. Push another button here to open a second trap door, and climb onto the roof.
The building you're standing on abuts a larger building. Shoot out the window and go in. A doberman is on guard in the checkerboard-tiled room to the left. Kill it, then leave this room for now and exit through the window opposite the one you came in. Jump to the red awning, then to the balcony and take the BOATHOUSE KEY from the sniper you shot earlier.
Return to the checkerboard room, go over the glassed-in walkway and throw a switch which opens a door outside. Return to the checkerboard room, shoot out the window and jump from the windowsill to the red awning across the canal. Go left across three red awnings to the door you just opened with the switch. Go in and throw a switch to open the large door below.
Jump down into the water, swim under the boathouse door and use the key to unlock the door. This cues a thug with a gun to appear on the dock by the wooden building. Swim out of the boathouse first and take care of him, relieving him of his AUTOMATIC PISTOLS. Then go back, get the boat and drive it through the door near the chain link fence, which you just opened with the switch above.
On the right, near this entrance is a small passage containing SECRET #1, the Stone Dragon, plus some flares. If you like, you can take the ladder down from here and kill 2 rats. Get back in the boat and continue straight. Turn right and take the boat over a waterfall. In the water below the falls is SECRET #2, the Gold Dragon. After retrieving it, take the only exit from this room into a room with many pillars. In the water just to the left of where you enter are 2 sets of Uzi clips. On the right is the ledge with the two rats you could see from above earlier. On the far left is another ledge with a door, a window and a ladder going up.
There's a rat on this ledge; kill it before continuing. The door doesn't open, so draw your guns and approach the window. Lara will aim at the thug behind the window, so shoot it out and dispatch the thug. Then take his auto pistol clips and the shotgun shells in the dark corner. Maneuver the boat into the alcove to the right of the ladder (there's a lever high on the left wall). This is actually a boat lock, which will raise you up to the next area. Return to the room and pull the switch to close the lock doors and raise the water level. Climb the ladder, jump in the water and pull the lever to open the exit doors.
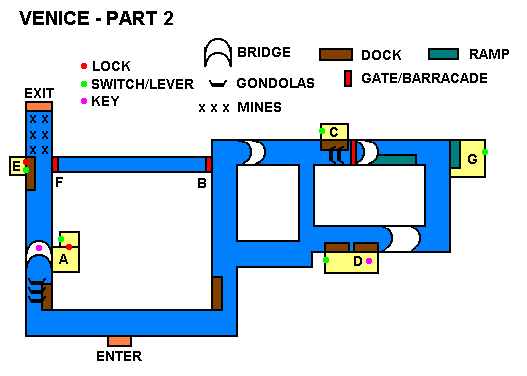
The next area is somewhat labyrinthine, so I've included a map (below). It's not completely realistic in terms of scale--more of a schematic. The orange block (marked ENTER) is the boat lock where you come into this area. I refer to areas marked with letters in the descriptions that follow. You can probably manage without the map, but it may help.
Go left at the entrance, turn the corner and ram through the three gondolas to clear a path. Before proceeding, get out at the dock at which the gondolas were parked. Climb onto the platform and jump across the canal, grabbing the red awning and pulling up onto it. Jump over to the stone bridge on your right. A doberman and a thug with a bat rush you from the left, another baddie with a gun from the left, so take care of all three. You can jump back down to the awning or dock if you need to. The bat thug has a large med-pack, which he'll no longer need, and the gun thug has a STEEL KEY; take both. Go into the roof garden (A) and use the steel key to unlock the door. Enter, drop through the door in the floor and flip a switch to open the first of two metal gates (B).
When you return to the roof garden, a guy with a gun is waiting. Kill him and take 2 sets of auto pistol clips. Another bad guy is patrolling the stone dock down the canal on the left. You may be able to snipe him from the bridge. When he's dead, go and lift 2 sets of M-16 clips off him. There's a locked door here (E), so next you'll need to find a key.
Return to the area where you came in. Ditch the boat and head right from the entrance, swim around the corner, climb on the dock and take out the thug with the gun here. Take a large med-pack and 2 sets of shotgun shells off the body. From here, you can take the boat or swim.
Continue straight past the dock where you just were, take the second right under a white stone bridge. Ahead is a dock with 2 gondolas nearby. Ram the gondolas, since you'll need a clear path here later on. When you step out on the dock, a bad guy with a bat comes through the door. Kill him and take the small med-pack he's carrying. Enter the building (C), killing 2 rats, then flip the switch that opens a door elsewhere (D).
Head through the narrow waterway across from the dock. Make a left and get out on the covered dock with the door that you just opened. When you step out here, a thug with a gun appears on the other dock just to the right. You can kill him now or wait and do it from above (the latter is probably easier). Enter the building (D) to find a room with shallow water and ladders on the walls. On the floor is an IRON KEY. The door you came in closes behind you, so climb up through the hole in the floor. You're met on the floor above by a thug with a bat and a dog. Kill them and take the small med-pack off the thug. Pull the lever that opens the exit door. If you didn't kill him eariler, you can shoot the thug below through the gap in the doorway. Or jump down and take care of him the hard way.
The iron key opens the door at the stone dock (E). Head back there. Unlock the door and take out a goon with a gun who emerges, then relieve him of a small med-pack. Go inside and flip a switch that opens the second metal gate (F).
There are underwater mines (x x x) in front of the exit, which is under the clock beyond the stone dock. At this point, it's a good idea to take one of your boats and set them off. Drive toward the mines and jump out at the last minute. You'll destroy the boat, but you can take the other one from the stone dock.
Now proceed to the room with the switch for the exit door (G). From the stone dock, go through the narrow waterway with the iron gates you opened, continue straight under the white stone bridge, turn right down the narrow waterway, then left past the two docks and under a bridge. Now turn left and you'll end up near two doorways--one small, one large. Inside this room is the exit switch, guarded by a bad guy with a gun. When he's out of the picture, take his auto pistol clips and walk out up the ramp.
Across the way is a long wooden ramp leading up to a glassed-in walkway. Go up, shoot out the windows, enter the walkway and take SECRET #3, the Jade Dragon (plus 4 sets of auto pistol clips if you've gotten all of the secrets).
Return to the room with the switch (G). Now comes the fun part--a run for the exit. When you push the button, the exit doors open. As soon as you go over the ramp, a timer starts and you'll need to get through the exit doors before the bell stops tolling and they close. There are two ways to do this: the James Bond way and the cheater way. Bond: Take your time getting in your boat. Position it facing the left side of the ramp. Now gun the engine (Ctrl + up arrow) and take off over the exit ramp and up the long wooden ramp. Now sail through the glassed-in walkway and land in the canal below. Go straight under the white bridge, corner left then right, go under the metal gate, through the narrow waterway and under the other metal gate. Make a hard right then gun it through the exit. Whew!
Now, the cheater way: Park the boat outside the exit room. Go in, flip the switch and swim out under the door. This way the timer never starts. Now you can drive your boat or swim to the exit at your leisure. Less stressful but also less fun.
Copyright © 1998 Stellalune. Special thanks are given to the participants in the alt.games.tombraider newsgroup, without whom some parts of this walk-through couldn't have been written. Feel free to copy, distribute and quote this walk-through, but please include this credit line so people can send me their corrections, comments and suggestions. Also, if you'd like to offer this on your own web site, kindly ask permission first.