LEVEL 7: 40 FATHOMS
Kills: 16 Items: 7 (11)* plus 3 secrets
(*Under found items, the number in parentheses shows total including extra items granted for finding all three secrets.)
This level begins with a movie. Lara hitches a ride on the submersible and winds up stranded at the bottom of the sea. Better find some air and fast! Turn around and swim toward the left, following the trail of junk on the sea floor to a sunken ship, and avoiding the great white shark. At the far left end of the wreck you'll see the anchor sticking out the top. Behind it is an opening. Swim inside, surface and get some air.
Two sharks will follow you in. You can try and harpoon them or hurry to the next safe area: Go through the large underwater opening on the right. Swim up and through a small passageway on the left. In the next room at the far left is another small opening. Go through this opening and head for the back left corner. Pull the lever that opens the trapdoor. Go through the trapdoor, then into the next room where you can climb out of the water.
Players of TR1: Note the recycled Atlantis music.
Swim through the opening behind the stack of crates. Pull the switch, which drains the water from the previous room. Return and use the crates to climb into the opening at the top. Drop down into the next room, taking care of the goon with the shotgun and avoiding the four center squares, which are actually a trapdoor to the room below. When the goon is dead, take his shotgun shells and SECRET #1, the Stone Dragon.
Now drop through the floor, kill the 2 thugs waiting below and grab their small med-pack and harpoons. Use the wooden blocks to get into the opening high in one corner.
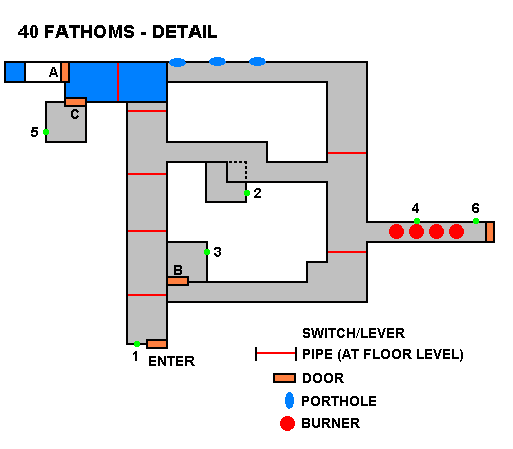
The following area involves several timed doors and twisting passageways. To make it easier, I've included a diagram (below). I refer to areas marked with letters and numbers in the descriptions that follow. You can probably manage without the map, but it may help.

First, go for the secret in the water outside. The switch (1) on the wall to the left as you enter this area opens a door at the far end of the passage and to the left (A). It's the fairly well camouflaged door on the short side of the wet floor. The door is on a timer, so flip the switch, press Look, then roll, and run down the passage, jumping over the floor level pipes. Once you're inside the door, it'll stay open.
At the end of this short passageway is a hole leading to the outside. At the end of the passage is an open area. SECRET #2, the Jade Dragon, rests on the sea floor to the left. (You can see it through the portholes in the passageway to the right of the area with water on the floor.) A shark and 3 barracudas stand guard. Theoretically, you can harpoon them, but I found it easier to just swim fast and avoid them as well as you can. When you've grabbed the dragon, return the way you came.
Now you'll need to get past the series of burners to the door beyond. This is nasty, so make sure you're well rested. (A few people posting to the alt.games.tombraider newsgroup have suggested simply sidestepping along the wall past the burners, feeding Lara med-packs, until you get to the other side. I haven't had any luck with this technique, so I'll give you my tips on doing it the hard way.)
First, the lay of the land for those without the diagram: Make your first left after you enter this area and continue to an opening in the ceiling. In the room above is a switch (2) which opens a door elsewhere (B). Go to this room by dropping down, heading right, then right past the corridor with the burners, then right again. At the end of this hallway is the room you just opened. Inside is another switch (3), which turns off the first 2 burners for a little while. Beyond the first two burners is another switch (4), which opens another door Copyright © just to the left of the door you entered to get the Jade Dragon. Inside this room is yet another switch (5), which turns off the second 2 burners. Beyond these burners is the final switch (6), which opens the exit door next to it. Simple, right?! ;-)
Now the moves: Begin at the switch in the room above the narrow hallway (2). Flip the switch and head for the room you just opened (B). Once there, flip the switch (3), look, roll, and run like mad to the burners. Flip the switch here (4), look, side flip to the left twice, then run like mad to the next door (C). Flip the switch here (5) to turn off the second set of burners, then run back to the room (B) with the switch (3) that turns off the first burners again. All the burners should be off now, so run through to the end. Now you can breathe deeply and pull the last switch (6) to exit. Whew!
My tips: Once you know where you're going, press Look as soon as you flip the switch to get Lara's perspective back. Then immediately roll and start running. Take running jumps through the low doorways rather than pulling up. Do running jumps down the straight hallways to cover more ground, and of course do a smooth series of running jumps over the pipe hurdles. Lastly, if you've run any leg of this gauntlet successfully, save your game as you flip the switch. Then if you flub the next run, you won't have to start all over.
The room beyond contains a pool. Take a dip to draw out a barracuda, then shoot it from above. Now comes yet another test of your patience. Swim down then up through a trapdoor. Head up through the next two openings. In the top area find the lever and pull it to open a door at the bottom (and close your escape to air). Head down into the opening you just made, and pull another lever to open the hatch at the very top. In an alcove near the lever is SECRET #3, the Gold Dragon. You can get it now, or surface for air first. Three more barracudas appear, so swim back to the top, get out of the water and take care of them. Now return and get the secret if you didn't before. (The bonus for all three secrets is 4 bundles of harpoons.)
Follow the passage from the water and drop down into a big room full of dirt(?). Continue down through another opening into the an even bigger dirt-filled room below. Find the moveable crate and pull it to climb into the opening above. Pull the switch here to open the trapdoor above and dump a lot of dirt into the big room. Return to the big room and look for two small openings along the left wall. Go up through the one on the left. From this room, continue up through an opening in the ceiling. Pull the switch here to flood a room elsewhere. Return to the lowest room and up through the right opening of the two next to each other. Climb through this room to the one above and flip a switch to open a door in the room you just flooded.
Return to the lowest room and climb over to the far left wall, beyond the open trapdoors. Enter a winding passageway and follow it to the end. Jump in the water and head for the door. A scuba diver lies in wait. Harpoon him or climb out and shoot him. Go through the passageway he came from, and climb out of the water to find yourself under attack by 2 goons with a gun and wrench. When they're dead, lift a large med-pack and shotgun shells, plus 2 bundles of harpoons lying on the floor. Pull the switch to open the door and exit the level.
Copyright © 1998 Stellalune. Special thanks are given to the participants in the alt.games.tombraider newsgroup, without whom some parts of this walk-through couldn't have been written. Feel free to copy, distribute and quote this walk-through, but please include this credit line so people can send me their corrections, comments and suggestions. Also, if you'd like to offer this on your own web site, kindly ask permission first.