THE
HIVE
Kills: 41 Items:
57 Secrets: 1
Enter and pick up a small
med-pack, magnum clips and 2 sets of Uzi clips. (Don't worry, the
monsters won't come to life until later.) Note the two closed doors.
Proceed to the room ahead with the checkerboard floor. There are
25 boulders dangling from the ceiling. The floor is conveniently
marked off in squares as well, with five rows of five squares under the
boulders and two rows of five without boulders beyond. Two of the
boulders roll harmlessly off to the sides as you approach. Stepping
on various squares causes various boulders to roll--and not in a very predictable
fashion. You're aiming for the two alcoves on the other side of the
boulders. I imagine there are a number of viable ways for getting
through this trap. Here's one.
To make it easier, I've
provided a diagram. (If the GIF image didn't transfer properly when you
downloaded this walk-thru, you can download it separately. The URL
is http://www.geocities.com/TimesSquare/Labyrinth/9596/hive.gif.) Each
square is marked with a letter or number (A through 9 for the 35 squares)
in the diagram. I've tried to make the description useful without
the diagram, but I think the visual aid helps a lot.
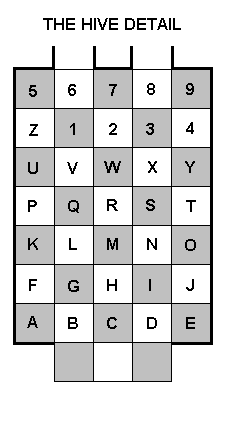 |
Stand in the doorway
on the left and step on the white square (D) to the left of the center
dark square (C). Side flip left to the next white square (B), then
quickly side flip back to D. When the boulders have passed, flip
back to B. Step forward to the dark square ahead (G), which is safe.
Jump diagonally to the dark square ahead and to the right (M). Boulders
roll past harmlessly on both sides. Sidestep to the white square
on the left (L). Side flip to the right to land on next white square
(N); quickly flip back to L. When the boulder has passed, flip back
to N. Step forward to the next dark square (S), which is safe.
Side flip left to the next dark square (Q), then quickly flip back to S.
When it's safe, flip back to Q. From there you can walk into the
left alcove safely.
Pull the switch here
to open one of the doors at the bottom of the hallway and animate one of
the monsters. Kill it from within the alcove if possible. When
you step on the dark square between the alcoves, a boulder comes rolling
in from the other side of the room, so go quickly to the right alcove.
The switch here opens the other door and revives the other monster, which
shoots fireballs. When it's dead, jump from the doorway (8) to the
white square in front of the boulder between the alcoves (2). From
here, you can step to the right then walk out under the boulder-free path
(1, V, Q, L, G, B). |
Enter the doorway on
the right near where you entered. Time a run past the metal jaw trap
then pick up 2 sets of magnum clips in the alcove beyond. Return
to the main hall and take the opposite door. Here there are arrow
traps as well as a jaw trap. Take each in turn and you'll manage.
At the end of the passage is a small med-pack.
Below is a series of
slopes above a lava pool. Jump to the far side of the first slope
so Lara slides down facing forward. Near the end of the slide, jump
to land on the next slide. Slide again and jump to the next slope,
which angles down to the left. Now hold down the Jump key so Lara
hops back and forth between the two angled slopes over the lava.
Press the right arrow key so she gradually creeps to the right as she jumps.
Stop when she reaches the flat spot at the far side of the right hand slope.
Enter the cave and kill
the monster lurking on the left. There's a small med-pack on the
ground in the back left corner. Jump up on the side of the structure
with the red-and-gold ceiling and the lava pit in the center. From
here, you can kill another monster on the far side of the room between
the black pillars. Pick up another small med-pack in the far left
corner.
Near where you entered
the cave is an opening leading down to the deep lava pit at the center.
As you approach, another monster flies up from below. When it's dead,
drop down to the flat block in the pit. Jump to the next block, drop
down again and do a running jump to grab the next block. This is
the only SECRET in the level, a large med-pack.
Return to the top of
the pit and go to the left down a small slope toward the lava stream.
Here you can jump across to the other side. Walk up the path until
you are opposite the first stone block in the lava pool. Take a running
jump to land on this block. Landing here causes the left door at
the other end of the lava pool to open. No need to go there.
Instead, take a running jump to the dark block with the Uzi clips, then
a standing jump to the next block with more Uzi clips. From here,
jump to the taller stone block. This opens the door on the right.
Both doors are timed. To get through the one on the right, jump from
the taller tan stone block to the lower block that had the clips on it,
then to the bank. Run down the ramp and do a running jump to grab
the door sill. Pull up and you're in.
Once inside, turn around
and slide backward down the tan slope. Grab the edge and traverse
left. Pull up, back flip onto the gray sloped block and immediately
jump forward to the fleshy wall. When you land, the eggs will hatch
and you'll need to kill 2 winged monsters. You might want to hold
down that walk key to keep from slipping into the lava below as you fight.
(If you do go through
the left timed door instead of the right, you can still get to this point
by sliding down the ledge on the left, then jumping to the fleshy flat
spot below the first egg. From there, do a running jump diagonally
to grab the stone slope below the second door. Then follow the directions
above from that point.)
From the fleshy wall,
face the now empty incubator. Jump over the steeply sloped stone
to slide down the slope beyond (the one directly below the incubator on
the right). You'll slide down and land on a fleshy square.
Jump diagonally to the stone block slightly above. Pull up to the
fleshy ledge, turn around, then take a diagonal running jump to the fleshy
slope below the opening.
The centaur above awakens
when you reach the top. You can hop back down while firing and flipping
side to side to avoid its fireball attacks. When it's dead, proceed
to the room above, drop down to the room below and pick up some Uzi clips.
From here, take a long
slide down to land in a small underground lake. You can surface on
the right side and kill a monster lurking on the ledge above. Pick
up the magnum clips. At some point, you'll also want to get 5 small
med-packs scattered about under the water.
Swim to the rectangular
block in front of the steps with the 3 monsters. Climb out of the
water and kill them safely from here. Jump over to the low, flat
area to the right, then to the bottom of the steps. Behind the steps
are 5 sets of Uzi clips. When you climb back out, 2 more monsters
emerge on ledges near the lake. After killing them, jump and grab
the block on the right side of the opening to the steps area to kill another
monster beyond and get some magnum clips.
The last monster in this
room guards the gold door. It can be killed from the low stone ledge
below the door. (You may find it helps to get a lock on it then jump
up and down in place to get more clear shots.) When it's dead, jump
over to the block on the right of the doorway and go up. Pick up
2 sets of Uzi clips in alcoves on the left, then use the two switches to
open the gold door and another one just beyond.
In the large room beyond,
2 centaurs lurk behind the pillars at the center. You can run out
into the room to get their attention, then rush back to the doorway to
kill them from relative safety. In the niches between the switches
are 3 sets of Uzi clips. Near the gold doors at the opposite end
of the room are 2 large med-packs.
There are four switches:
two on each side of the central pillars. Of the two on the side facing
the entrance, the left opens the left gold door, releasing a monster.
The switch on the right opens a door at the top of the pyramid in the middle
of the lake. On the other side of the pillars, the left switch opens
another door in the pyramid (not really necessary if you pulled the previous
switch). The right switch opens the other gold door, releasing a
monster that throws fireballs.
Enter either gold door.
The three eggs hatch as you approach them, releasing a centaur (middle)
and 2 winged monsters. When they're dead, jump in the water and pull
the two levers to open doors on each side of this pool. Behind the
left door are 4 sets of Uzi clips and a large med-pack. Behind the
right door is a warren of underwater tunnels containing 3 boxes of shotgun
shells, 2 sets of Uzi clips and a large med-pack. There's also another
lever, which opens a door leading directly back to the lake.
It's possible to climb
up the pyramid in the middle of the lake on the side where the tan stone
bridge connects to the shore. Pick up some Uzi clips on the way up.
Once at the top, enter through either of the red lacework doors (which
you opened earlier). A monster lurks beyond. In an alcove high
on the left side of the room is a small med-pack. There are 2 boxes
of shotgun shells in the long corridor on the right.
One of the two doors
at the end of this corridor opens as you approach. In the room beyond
stand 8 monsters. Pick up the shotgun shells (7 boxes), taking the
ones on the pedestal last. When you try to exit, some of the monsters
animate, so jump back on the pedestal as fast as you can. You may
have to jump down a few times to draw some of the monsters out of hiding,
but eventually you'll kill all but three. These pursue as you exit,
so you can run down the hallway, roll, and back out shooting.
Return to the doors at
the end of the hallway. The second door is now open. This leads
into a room with a checkerboard floor, beyond which is the hatchery.
There are two switches near the entrance. Both are needed to open
the gold door, and the door is timed. The eggs hatch when you approach,
releasing 4 winged monsters that throw fireballs. I recommend hatching
each one in turn, so you aren't outnumbered. Then pull the switches
and run for the door.
As you enter, the door
closes behind you and the centaur playing nanny starts shooting fireballs.
All the eggs in this room are "blanks," so there's no need to worry about
more enemies. Behind and below the ramp down to the next level are
2 sets of Uzi clips and a large med-pack.
You don't have to kill
all the monsters in this next room but, again, I recommend hatching each
egg and fighting the beasties one at a time before going for the door.
Here every other egg is empty, so 4 monsters in all. Once the coast
is clear, go to the switch. The door is timed (naturally); here's
one way to navigate: Position Lara's right shoulder near the center
of the switch, flip it, look, hop back, turn to the left, take a standing
jump up to the first block, then do a continuous series of running jumps
over the blocks and through the door.
You land on a slide which
dumps you in a pool as monsters hatch above. There's no way to get
out and kill them (that I found), so just swim off to the right to end
the level.
And that's all she wrote...at
least until the next installment!
Copyright © 1998 Stellalune.
Special thanks are given to the participants in the alt.games.tombraider
newsgroup, without whom some parts of this walk-through couldn't have been
written. Feel free to copy, distribute and quote this walk-through,
but please include this credit line so people can send me their corrections,
comments and suggestions. Also, if you'd like to offer this on your
own web site, kindly ask permission first. To give me your feedback,
send e-mail to stellalune@earthlink.net.
Return to Level
Menu